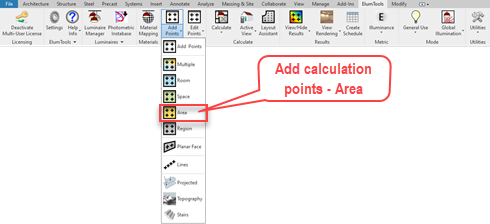
Add Calculation Points_Area
|
Areas must exist in an "Area Plan" in Revit. Using Areas simply provides another option for placing calculation points in your Revit projects. By default, Areas are unbounded in the Z-direction so special attention needs to be paid to the Area offsets.
You can add calculation points to any Area by selecting the Add Points command with the Area option, followed by a click on the Area indicator in Revit (in the Area plan). This sequence can also be performed in reverse by selecting an Area (or multiple) in Revit followed by the main Add Points button on the ElumTools toolbar. This bypasses the need to access the specific command from the menu. |
|
If all Areas will use the same settings, you can window across as many as you like in Revit, filter the selection for only Areas, and then select the main Add Points button.
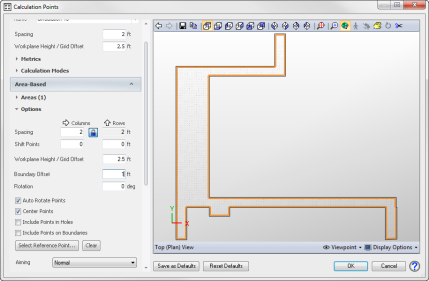
Calculation point dialog - Area
Once the Area(s) have been selected, the Add Calculation Points dialog will appear for you to assign specific details to the calculation grid(s). Typical input will be Point spacing and Workplane height. By default, the illuminance Metric is selected and all Modes are active (General Use, Emergency, Daylight and Horticulture), for the grid of points. You can make changes if necessary by opening these sections of the dialog.
Specific details with regard to point locations can be accessed from the Area-Based section of the dialog. Center Points and Auto Rotate Points are selected by default. You may wish to include a Boundary Offset to move points away from walls or intersections. Details on all of the additional settings can be found in the general Add Calculation Points topic.